Millisecond delay on the STM32F103
Controlling the timer peripherals on the STM32F103 chip can be quite daunting because of the large number of ways in which the timers can be set up and used. However, going to the effort to understand the hardware timers is well worth the effort, as there is so much you can do with the timers, from running servo or stepper motors, to generating delayed pulses on an input trigger, to timing pulse durations to drive an ultrasonic transducer. In this post I thought we would try something relatively simple, while still being useful: a hardware delay word. This is a good way to get the basic idea for how a timer should operate.
Mecrisp does not contain a hardware delay word like us for microsecond-scale delays or ms for longer delays. We can simulate it in hardware by running through an empty DO...LOOP data structure. On my STM32P103 board, a delay caused by counting to around 12000 is enough for a 1-ms delay. But this is imprecise, and system dependent, and also unnecessary when the microcontroller has a hardware timer.
The STM32F103RB has 1 advanced control timer, TIM1, and three other general-purpose (GP) timers (TIM2-TIM4). There isn’t a lot of difference between these timers, although the advanced timer has both the normal output and its complement, whereas the GP timers have only a single output. Other chips in this family also have simple timers with very basic functionality, and if this chip had such a timer we would use it, but it doesn’t, so in this case we are going to achieve our delay with TIM4, one of the general-purpose timers. I could have done this with any of the timers, but the delay is probably best done with the timer you might otherwise use last, so you still have the one advanced timers, and two GP timers for other timing tasks.
To do what we need to do with the general-purpose timers, we first need to have the bit-setting words described in this post: General Forth Words for GPIO On The STM32F103. We will be using the set_bits word to set or reset the appropriate bits on the timer register. So if you have not looked at that article, take the time to do it now, and load the words described there into Mecrisp Forth and Save them to flash, as you will need them to do what I describe below.
What Timers Do
A timer is mostly just a combination of a clock and a counter, with logic that tells the timer what to do when the counter reaches certain pre-set values. All the counters on the STM32F103RB chip are 16-bit counters, meaning that they can count from 0 to 65535. They are able to drive GPIO pins once the counter has reached the pre-set values, or they can start or stop counting when a GPIO pin has changed its state. This allows counters to time input pulses and to generate output pulses with a given duration.
Some of the Chips in the ST family have precision timers with 32-bit resolution for high-resolution timing applications. We won’t discuss them here.
The Important Timer Registers
A general-purpose timer timer has many registers, as outlined in the chip’s manual. Here we refer to the general operations of timers the way the manual does, so TIMx refers to any of TIM1, TIM2, TIM3, TIM4. When searching through the manual, refer to TIMx rather than the individual timer you are interested in. It’s important to note that the Advanced, GP and Simple timers each have their own separate chapters in the chip manual – don’t look at the advanced timer chapter if you are looking at the GP timers! Thankfully, most of the registers are the same for the different types of timers, so most of the information described below also applies for the advanced timers. But there are some small differences in places, so it’s best to look in the appropriate chapter for the timer you are using.
For basic operation, these are the important registers:
RCC_APB1ENR: this register turns on the clock for driving the timers. We have already seen the companion register RCC_APB2ENR when we wanted to drive the GPIO clocks.TIMx_PSC: the prescale register. This is a clock divider where the timer takes the system clock frequency and divides it by the value in this register (plus 1) and divides the clock speed by this number. We do this so we can time longer duration pulses. If there were no prescaler then for a clock operating at 72 MHz frequency, we could only count to 65536 at 72 million clock cycles/second, or about 910 microseconds. By scaling down the clock speed, for example if you were to put 71 in this register, you would slow the clock down from 72 MHz to 1 MHz, allowing for longer times to be measured.TIMx_ARR: This is the auto-reload register, a 16-bit register that contains the maximum number the counter will count up to or down from. If counting up, the timer will reset to zero after reaching this number. If counting down, when the counter reaches zero it resets to this number so it can count down again. This register can contain any number from 0 to 65535. If you are generating a continuous waveform with the counter (using something we refer to as pulse-width modulation or PWM) then changing the value in theARRregister is the same as changing the period of the pulse.TIMx_CR1 and TIMx_CR2: The control registers for the timer that determine the type of counter, direction of counter, trigger for the counter to start etc.TIMx_CNT: The register containing the actual count value for the timer.
A Count-down Delay
For the case of a millisecond delay word, all we need to do is set up the timer, set it to count the appropriate number of counts with the correct prescaler, then set it going. If we configure the counter as a down-counter, we must then keep checking to see whether the counter has decreased to zero. If it has, the delay has been completed and the code can continue to do what it was already doing.
The Code
The first thing we do is set the clock speed. The 72MHz word has already been defined in Warp Speed in Mecrisp-Stellaris. Once we are operating at the right speed, we set the variable Freq to that speed. Then we define the base address and offsets for TIM4. Note that you can use the same offset values for any of the timers, so there is no need to redefine them, or to have variables like TIM1_ARR and TIM2_ARR etc. We just need to define the base address of the timer peripheral we want to use and then call the ARR word (for example) to add the appropriate offset for the autoreload register.
72MHz \ Set the system clock to 72 MHz if it wasn't already
72000000 constant Freq \ PSC clock frequency
\ Define registers
$40000800 constant TIM4
: CR1 ;
: EGR $14 + ;
: PSC $28 + ;
: ARR $2C + ;
: CNT $24 + ;
The next word we define is init_delay. This word turns on the clock for the timer and disables it, allowing the other registers to be changed without affecting the output of the timer. We run this word when loading the file containing this word set to be sure that the timer is clocked but turned off.
: init_delay ( -- )
  RCC_APB1ENR %1 1 2 set_bits \ Turn on clock for timer 4
  0 TIM4 CR1 ! \ Disable the counter
;
init_delay
The next word we define is delay, which is a word that performs a delay for a given number of clock counts. This particular word will work regardless of whether we want delays in microseconds or in milliseconds. The particular type of delay will be defined later, and will be designed to call delay with the appropriate arguments and register settings to give the delay we need. The word delay determines a down-counting single-shot delay, then turns on the counter. A BEGIN...UNTIL loop will wait until the down-counter reaches zero, at which point execution of the word will cease.
: delay ( count -- )
  TIM4 EGR %1 1 0 set_bits 	\ Reinitialise counter and update registers
  DUP TIM4 ARR H! TIM4 CNT H!     \ Set the value in the ARR and CNT Registers
  TIM4 CR1 %11001 5 4 set_bits 	\ Down-count, single shot, enable the counter
  BEGIN 1 TIM4 CR1 bit@ 0= UNTIL
;
The first line uses the set_bits word defined in General Forth Words for GPIO On The STM32F103 to set bit 0 of the EGR register (the UG bit), which resets the counter and the timer registers. Then it takes the count value and stores it in both the ARR and the CNT registers of the timer. The third line sets the parameters of the timer in the CR1 register, and the final line tests for when the timer has decremented to 0. Because the timer has been set to one-shot operation, there is no danger of missing the zero count.
Once the delay word has been defined, it only remains to make words for microsecond and millisecond delays, which just have to set an appropriate value for the prescaler. Now in the STM32 timer chips, the prescaled clock frequency is related to the system clock frequency and the value in the PSC register via the following relationship:
\[ f_{PSC}= \frac{f_{CLK}}{PSC + 1}\]
or, alternatively the value in the prescaler is given by
\[ PSC = \frac{f_{CLK}}{f_{PSC}} – 1 \]
The 1 added or subtracted in these two equations comes from the fact that when the prescaler is set to 0, the frequency of the counter clock is the same as that of the system clock. Knowing this, we can define our microsecond and millisecond delay words, us and ms, respectively:
: us ( n -- )
  DUP 60001 < IF
    Freq 1000000 / 1- TIM4 PSC H!
    delay
  ELSE CR . ." us delay too long.  Use ms instead."
  THEN ;
: ms ( n -- )
  \ Times up to 30 seconds
  DUP 30001 < IF
    Freq 2001 / TIM4 PSC H!
    2* 1- delay
  ELSE CR . ." ms Delay too long."
  THEN ;
Using this setup, we can type something like 200 ms to generate a delay of 200 milliseconds, or 1000 us to generate a delay of 1000 microseconds. Execution will pass to the next word to be evaluated once the delay word has completed by counting down to zero.
Note that the ms word halves the prescaler and doubles the number of counts, because otherwise the prescaler value would be 72000, which is larger than can be stored as a 16-bit number. I have had to modify the counter value a little from the expected value to remove an offset, but it provides an accurate delay between 1 and 30000 ms.
We can test the behaviour of these words by writing some test words that turn on and off a GPIO port pin, before and after execution of the delay. For example, the following are words to test the ms and us delay words:
: mstest ( n1  -- ) \ test for ms delay
  GPIOC enable
  GPIOC 10 ppout
  GPIOC 10 GPon
  ms
  GPIOC 10 GPoff ;
: ustest ( n1  -- ) \ test for us delay
  8 MAX 7 - \ remove offset of 7 us
  GPIOC enable
  GPIOC 10 ppout
  GPIOC 10 GPon
  us
  GPIOC 10 GPoff ;
The 8 Max 7 – ensures that the 7 microsecond offset from executing the word is removed from the count, and that the delay is a minimum of 8 microseconds long. The delay in the code execution prevents us from using a lower delay than this.
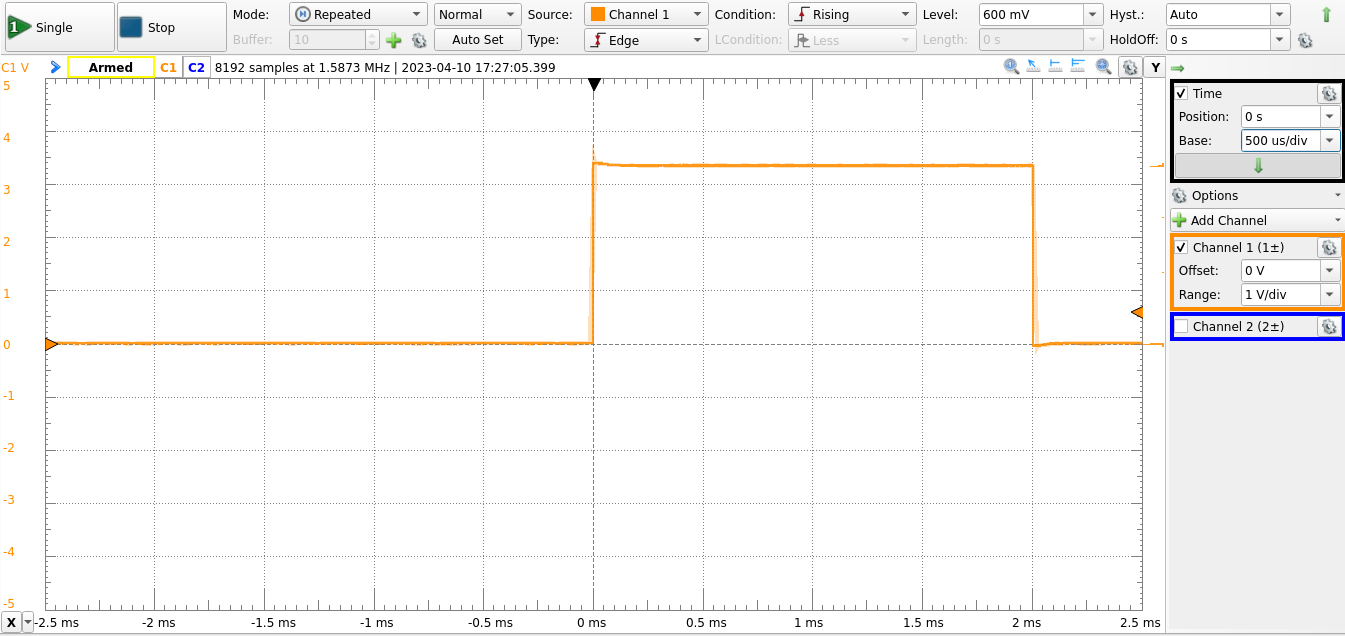
Typing something like 2 mstest will generate a pulse that is 2 ms long on PC10. This will result in a waveform that looks like the one below:
Note that the utest word removes 7 microseconds from the count. This is done to compensate for the time required to execute the Forth words, which becomes significant at small delays.
Leave a Reply